How to Install the Facebook Pixel with Google Tag Manager to Allow You to Get in Front of Your Followers Again and Again
What is the Facebook Pixel and why do you want to use it?
The Facebook Pixel is a piece of code that lives on your website and sends tracking information back to Facebook. You want this on your site, so Facebook can build re-marketing audiences for you. Re-marketing audiences are the key to digital marketing to get in front of your most familiar followers again and again. This is what ultimately leads to those visitors doing business with you.
Why do you want to use Google Tag Manager to install your Facebook Pixel?
Google Tag Manager (GTM) will help speed up implementation of your tags, give more security in tag firing, and allow your pages to load faster, among many reasons. When you install GTM, you no longer have to deal with code on your website. You simply add tags from the GTM dashboard on Google.
Create and Install Google Tag Manager on WordPress
- Create a Google Tag Manager (GTM) account at https://tagmanager.google.com that you associate with your Gmail and Google Analytics accounts.
- Setup your account and name it.
- Setup a Container and name it. This is where your tracking codes will live.
- Choose WEB, then CREATE.
- Open a new tab on your brower.
- Go to your WordPress Dashboard to Plugins.
- Install the Tracking Code Manager plugin by IntellyWP.
- Once installed, look at your plugins, locate Tracking Code Manager, then click Settings.
- Click the green button to Add new Tracking Code. If this is your first time to add a tracking code, follow the prompts to create one.
- Go back to Google Tag Manager (GTM).
- Click on the ADMIN tab inside your Container.
- Click Install Google Tag Manager. This is the code you will install on your website.
- Copy the code in the top area to your clipboard.
- Go back to your website to add your GTM tracking codes. You will add them separately. Make sure you check the Active box to make the code active on your site.
- Paste the first code into the black area, then choose Before </HEAD> from the dropdown box below the black area.
- Check Standard code tracking in your Wordpress.
- Check In the whole website (pages, posts and archives).
- Save the tracking code.
- Click the green button again to add a new tracking code.
- Paste the second code in the black area, then choose After <BODY>.
- Check Standard code tracking in your Wordpress.
- Check In the whole website (pages, posts and archives).
- Save the tracking code.
Install the Chrome Facebook Pixel Helper
The Facebook Pixel Helper extension has to be used on the Google Chrome browser. This extension is necessary to be able to verify if your Pixel is installed correctly on your website pages.
![]()
- Use the Google Chrome browser for this exercise.
- Search Facebook Pixel Helper on Google or visit https://chrome.google.com/webstore/detail/facebook-pixel-helper/fdgfkebogiimcoedlicjlajpkdmockpc?hl=en.
- Click ADD TO CHROME to add the extension.
- Notice the helper icon in your browser bar at the top.
- When you navigate to a webpage, the icon will turn blue and have a number on it.
- Click on it to see what Facebook Pixel events are installed on that page.
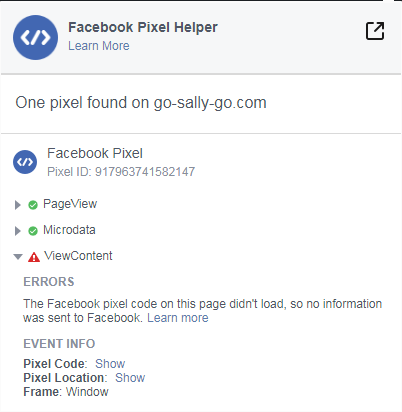
This is what the Facebook Pixel Helper looks like. Note that the PageView pixel has been installed properly, as it shows up in green. Whereas, the ViewContent pixel has not been installed properly, as it shows up in red with an error message. This is how you know if your pixel has been installed properly or not.
The ViewContent pixel is a Standard Event pixel that is not covered in this blog post. It is covered in the Make Facebook Your ATM full course.
Create, Install, and Verify Your Facebook Pixel
- Go to Facebook Ads Manager.
- Click on the menu bar at the top left, then click All Tools at the bottom left to open all the menu options.
- Find Pixels in the Measure & Report
- Once inside the Pixels area, click CREATE PIXEL if you haven’t created it before. If you have created one before, then click on the name of your pixel first, then click Set up.
- Then choose to install your pixel manually.
- DO THIS IF YOU DID NOT INSTALL GTM: If you choose to paste the code manually, and you installed the Tracking Code Manager plugin on your Wordpress site, you can paste the code right into that plugin using Before </HEAD> as your dropdown option and put it on every page of your site.
- DO THIS IF YOU INSTALLED GTM: If you installed the Google Tag Manager on your site, then move forward with the rest of these instructions by first choosing to use Tag Manager. Select the Google Tag Manager on the next screen.
- Go through the Quick Install instructions for your Facebook Base Pixel.
- Select your Google Tag Manager Account and then your Container.
- Add a New Tag, then name it Facebook Base Pixel.
- Choose PageView as the Event.
- Firing Options are Once Per Page.
- Firing Triggers are All Pages.
- Click Add.
- Click Publish.
- Go to your website URL and click on your Facebook Pixel Helper in the Google Chrome browser tool bar. Your pixel will show up there as installed.
Create Re-Marketing Audiences on Facebook
Re-marketing audiences can now be created on Facebook for you to get in front of your potential customers again and again. This is key to making digital sales.
If you'd like to learn more about Facebook marketing and advertising with Sally Hendrick, consider Make Facebook Your ATM, a digital course that teaches you what you need to know to be successful with Facebook ads. Not only can you get access to the course, you can upgrade to get access to Sally's mastermind with live Q&A calls and additional educational materials and trainings only for mastermind members.

Get content-making tips and my FUNNY HOLIDAYS calendar for FREE for daily content inspiration!

Stand UP for What You Believe In & Stand OUT From the Crowd!

Make EXPLOSIVE & Influential Content with this All-in-One Kit!